
Wide and Deep Learning
In June 2016, Google published a paper on wide and deep learning. This neural network architecture is supposedly great for regression and classification problems with sparse inputs, such as recommendation systems or search ranking problems. Since, I am currently working on a search ranking problem, I thought it would be great to familiarise myself with this architecture and see how it works. In this post, I will first go into the intuition behind wide and deep learning. After which, I will showcase the full implementation of this technique.
What is Wide and Deep Learning?
It is a supervised learning neural network architecture that combines a wide model and a deep model into one single architecture. The wide model takes in cross-product categorical features as inputs, and it is capable of memorizing the relationship between feature inputs and the dependent variable. On the other hand, the deep model takes in numerical and categorical features as inputs, pass it through multiple layers of neurons, and it is great at generalizing the relationship between feature inputs and the dependent variable.
The wide and deep network are then combined at the end before passing it through an activation function to obtain the prediction. By combining these two model, we are able to enable both memorization and generalization within a single network.
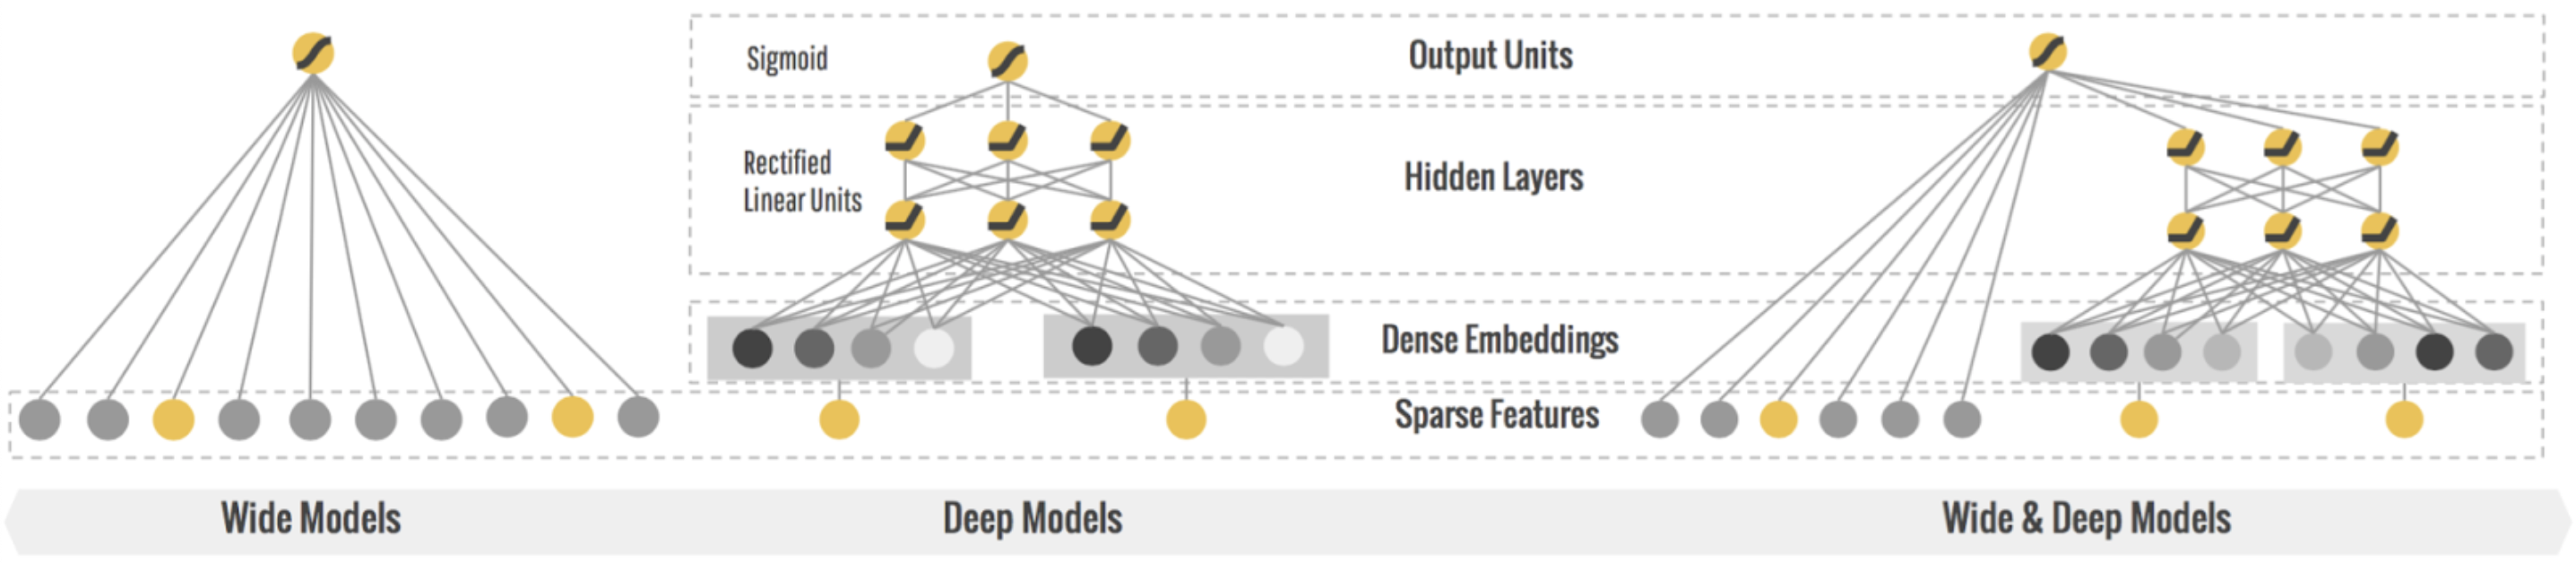
Fig. 1. Wide and Deep Learning - (Image source: here)
Implementation
The following sections will focus on the implementation of wide and deep learning using Keras with TensorFlow backend. I will be using Keras’ functional API as this architecture requires multiple input data sources.
✅ Keras Function API is suitable when you have multiple inputs and outputs in your neural network.
Data Set
The data set that I will be using is MovieLens 100k. This data set is widely used as a benchmark for recommendation systems. It consists of 100,000 ratings (1 to 5) from 943 users on 1,682 movies. Metadata of the users and movies are also provided in the data set. You can download this data set on Kaggle by clicking here.
Import Libraries
Let’s start off by importing the necessary libraries
import os
import pandas as pd
import numpy as np
from time import time
from datetime import datetime, timedelta
from sklearn.preprocessing import OneHotEncoder, LabelEncoder, MinMaxScaler
from sklearn.model_selection import train_test_split
from keras.layers import Input, Embedding, concatenate, Flatten, Dense, Dropout, merge
from keras.models import Model
from tensorflow.keras.utils import plot_model
from tensorflow.keras.callbacks import TensorBoard, EarlyStopping, ModelCheckpoint
import keras
import tensorflow as tf
Preparation of Data
After downloading the data from Kaggle, we will need to import and combine the data files into one single dataframe.
# Column headers for the dataset
data_cols = ['user id', 'movie id', 'rating', 'timestamp']
item_cols = ['movie id', 'movie title', 'release date', 'video release date', 'IMDb URL', 'unknown', 'Action',
             'Adventure', 'Animation', 'Childrens', 'Comedy', 'Crime', 'Documentary', 'Drama', 'Fantasy', 'Film-Noir',
             'Horror', 'Musical', 'Mystery', 'Romance ', 'Sci-Fi', 'Thriller', 'War', 'Western']
user_cols = ['user id', 'age', 'gender', 'occupation', 'zip code']

# Importing the data files into dataframes
users = pd.read_csv('data/ml-100k/u.user', sep='|', names=user_cols, encoding='latin-1')
item = pd.read_csv('data/ml-100k/u.item', sep='|', names=item_cols, encoding='latin-1')
data = pd.read_csv('data/ml-100k/u.data', sep='\t', names=data_cols, encoding='latin-1')

# Create a merged dataframe
df = pd.merge(pd.merge(item, data), users)
For the wide component, I performed cross-product feature transformation by combining \(\textit{gender}\) and \(\textit{occupation}\). One-hot encoding was then applied on the cross-product features. In the paper, Google mentioned that the wide part only needs a small number of cross-product feature transformations to complement the deep part, rather than a full-size wide model.
df_wide = df[['gender', 'occupation']]
df_wide['gender_occupation'] = df_wide['gender'] + "_" + df_wide['occupation']
encoder = OneHotEncoder(handle_unknown='ignore')
encoder.fit(df_wide[['gender_occupation']])
one_hot_encoded_df = pd.DataFrame(encoder.transform(df_wide[['gender_occupation']]).toarray(),
                                  columns=encoder.get_feature_names())
df_wide = df_wide.join(one_hot_encoded_df)
df_wide.drop(['gender', 'occupation', 'gender_occupation'], axis=1, inplace=True)
The data inputs for the wide part is a sparse dataframe that looks like the following:
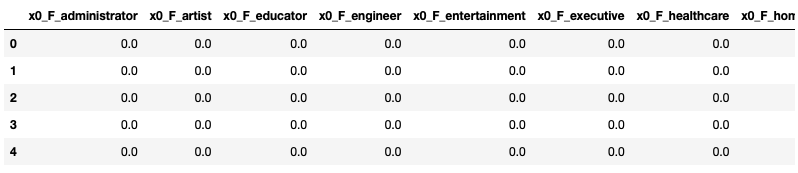
Fig. 2. Wide Data Inputs
For the deep component, I combined the sparse genre categorical features into one single genre categorical feature. Label encoding is applied on categorical features while min-max scaling is applied on numerical features.
df_deep = df[['age', 'unknown', 'Action', 'Adventure', 'Animation', 'Childrens', 'Comedy', 'Crime', 'Documentary',
              'Drama', 'Fantasy', 'Film-Noir', 'Horror', 'Musical', 'Mystery', 'Romance ', 'Sci-Fi', 'Thriller', 'War',
              'Western', 'gender', 'occupation']]
# Combine sparse categorical features into one single genre feature
df_deep['genre'] = df_deep[['unknown', 'Action', 'Adventure', 'Animation', 'Childrens', 'Comedy', 'Crime', 'Documentary',
                            'Drama', 'Fantasy', 'Film-Noir', 'Horror', 'Musical', 'Mystery', 'Romance ', 'Sci-Fi',
                            'Thriller', 'War', 'Western']].idxmax(1)
df_deep.drop(columns=['unknown', 'Action', 'Adventure', 'Animation', 'Childrens', 'Comedy', 'Crime', 'Documentary',
                      'Drama', 'Fantasy', 'Film-Noir', 'Horror', 'Musical', 'Mystery', 'Romance ', 'Sci-Fi', 'Thriller',
                      'War', 'Western'], axis=1, inplace=True)

# Encode categorical features
for feature in ['gender', 'occupation', 'genre']:
    encoder = LabelEncoder()
    encoder.fit(df_deep[[feature]])
    transformed_feature = encoder.transform(df_deep[[feature]])
    df_deep[feature] = transformed_feature

# Min-max scaling for numerical features
for feature in ['age']:
    scaler = MinMaxScaler()
    scaler.fit(df_deep[[feature]])
    transformed_feature = scaler.transform(df_deep[[feature]])
    df_deep[feature] = transformed_feature
The data inputs for the deep part is a dense dataframe that looks like the following:
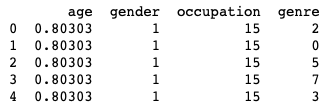
Fig. 3. Deep Data Inputs
Finally, we we will need to split the data into separate input and output components for the neural network to consume.
# Split data
X = pd.concat([df_wide, df_deep], axis=1)
y = df[['rating']]
X_train, X_test, y_train, y_test = train_test_split(X, y, test_size=0.2, random_state=42)

def prepare_independent_variables(X):
    """Split X dataframe into its separate input components for the neural network
    """
    wide_inputs = X[['x0_F_administrator', 'x0_F_artist', 'x0_F_educator', 'x0_F_engineer',
                     'x0_F_entertainment', 'x0_F_executive', 'x0_F_healthcare',
                     'x0_F_homemaker', 'x0_F_lawyer', 'x0_F_librarian', 'x0_F_marketing',
                     'x0_F_none', 'x0_F_other', 'x0_F_programmer', 'x0_F_retired',
                     'x0_F_salesman', 'x0_F_scientist', 'x0_F_student', 'x0_F_technician',
                     'x0_F_writer', 'x0_M_administrator', 'x0_M_artist', 'x0_M_doctor',
                     'x0_M_educator', 'x0_M_engineer', 'x0_M_entertainment',
                     'x0_M_executive', 'x0_M_healthcare', 'x0_M_homemaker', 'x0_M_lawyer',
                     'x0_M_librarian', 'x0_M_marketing', 'x0_M_none', 'x0_M_other',
                     'x0_M_programmer', 'x0_M_retired', 'x0_M_salesman', 'x0_M_scientist',
                     'x0_M_student', 'x0_M_technician', 'x0_M_writer']].values
    categorical_input_1 = X[['gender']].values
    categorical_input_2 = X[['occupation']].values
    categorical_input_3 = X[['genre']].values
    numerical_input = X[['age']].values
    return wide_inputs, categorical_input_1, categorical_input_2, categorical_input_3, \
           numerical_input

wide_inputs_train, categorical_input_1_train, categorical_input_2_train, \
categorical_input_3_train, numerical_input_train = prepare_independent_variables(X_train)

wide_inputs_test, categorical_input_1_test, categorical_input_2_test, \
categorical_input_3_test, numerical_input_test = prepare_independent_variables(X_test)

y_train = y_train.values
y_test = y_test.values
Define Model Architecture
This is the part where we start to define the wide and deep learning network architecture using Keras’ functional API.
For the deep portion, I defined a network that consists of 11 hidden layers - 1 embedding layer and 10 dense layers. The embedding layer transform each categorical feature into a 64-dimensional array. Within each of these hidden layers, I have implemented a dropout rate of 20% as a way of regularization to avoid overfitting. In addition to that, I implemented skip connections within the dense hidden layers in order to avoid the vanishing gradient problem, since this is a rather deep network.
# Define our deep network with the Functional API
max_num_categorical_values = 50
emb_dimension = 64
max_sequence_length = 1

categorical_input_1 = Input(shape=(1,), name='categorical_input_1')
emb_1 = Embedding(input_dim=max_num_categorical_values, output_dim=emb_dimension,
                  input_length=max_sequence_length, name='emb_1')(categorical_input_1)
emb_1 = Flatten()(emb_1)
categorical_input_2 = Input(shape=(1,), name='categorical_input_2')
emb_2 = Embedding(input_dim=max_num_categorical_values, output_dim=emb_dimension,
                  input_length=max_sequence_length, name='emb_2')(categorical_input_2)
emb_2 = Flatten()(emb_2)
categorical_input_3 = Input(shape=(1,), name='categorical_input_3')
emb_3 = Embedding(input_dim=max_num_categorical_values, output_dim=emb_dimension,
                  input_length=max_sequence_length, name='emb_3')(categorical_input_3)
emb_3 = Flatten()(emb_3)
numerical_input = Input(shape=(1,), name='numerical_input')
concatenated_embeddings = concatenate([emb_1, emb_2, emb_3, numerical_input])
concatenated_embeddings = Dropout(rate=0.2)(concatenated_embeddings)
x1 = Dense(64, activation='relu')(concatenated_embeddings)
x1 = Dropout(rate=0.2)(x1)
x2 = Dense(64, activation='relu')(x1)
x2 = Dropout(rate=0.2)(x2)
x3 = Dense(64, activation='relu')(x2)
x3 = Dropout(rate=0.2)(x3)
x4 = Dense(64, activation='relu')(merge.add([x1, x3]))
x4 = Dropout(rate=0.2)(x4)
x5 = Dense(64, activation='relu')(x4)
x5 = Dropout(rate=0.2)(x5)
x6 = Dense(64, activation='relu')(x5)
x6 = Dropout(rate=0.2)(x6)
x7 = Dense(64, activation='relu')(merge.add([x4, x6]))
x7 = Dropout(rate=0.2)(x7)
x8 = Dense(64, activation='relu')(x7)
x8 = Dropout(rate=0.2)(x8)
x9 = Dense(64, activation='relu')(x8)
x9 = Dropout(rate=0.2)(x9)
deep_output = Dense(64, activation='relu')(x9)
For the wide portion, I simply input the data as inputs.
# Define our wide network with the Functional API
num_features = len(df_wide.columns)
wide_inputs = Input(shape=(num_features,), name='wide_inputs')
Combining the wide and deep portion involves taking the ouputs of the wide and deep portion as inputs, then passing it through an activation function.
# Combine wide and deep into one model
x = concatenate([wide_inputs, deep_output])
x = Dropout(rate=0.2)(x)
wide_and_deep_output = Dense(1, activation='relu')(x)
wide_and_deep_model = Model(inputs=[wide_inputs] + [categorical_input_1] +
                            [categorical_input_2] + [categorical_input_3] +
                            [numerical_input], outputs=wide_and_deep_output)
wide_and_deep_model.summary()
plot_model(wide_and_deep_model, to_file='wide_and_deep_model.png', show_shapes=True, show_layer_names=True)
The overall wide and deep learning network architecture will look like this:
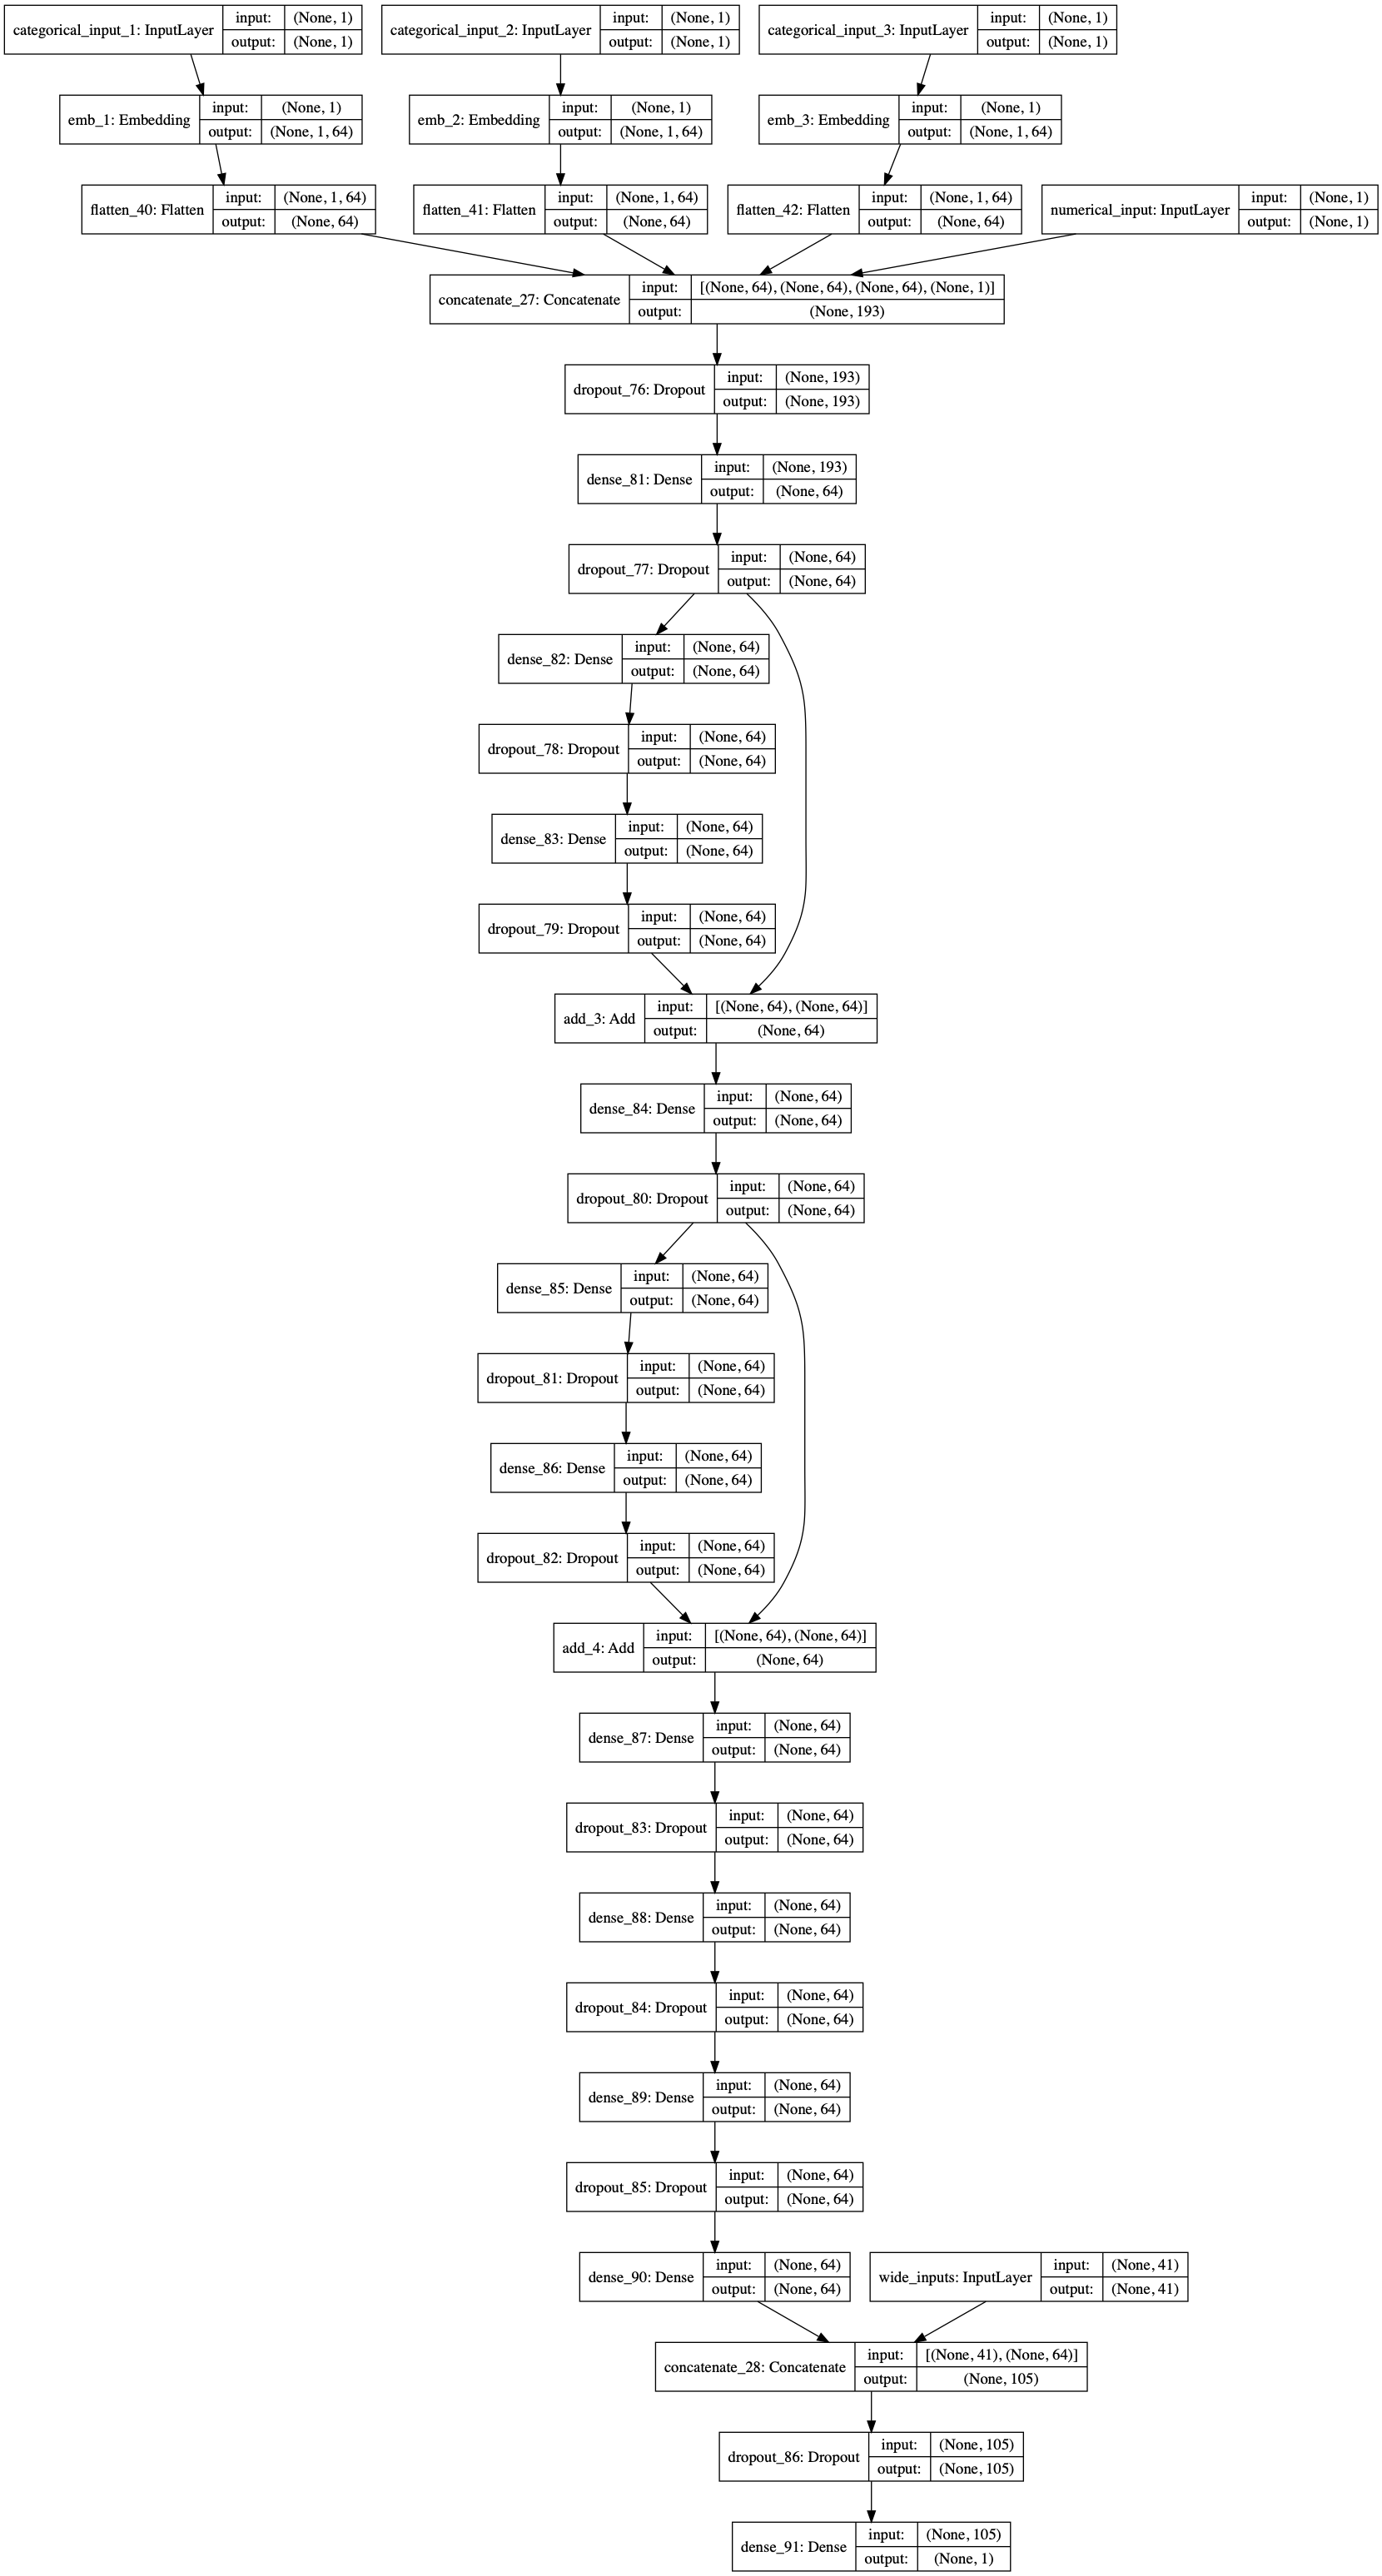
Fig. 4. Wide and Deep Model
Compile
After the model is defined, compilation is needed to define the loss function, optimizer, and evaluation metrics. Since the movie rating that we are predicting is a continuous numerical variable, mean squared error (MSE) or mean absolute error (MAE) are suitable losses and evaluation metrics to use.
wide_and_deep_model.compile(loss='mse', optimizer='adam', metrics=['mse'])
Train
For training, we can set callbacks to implement model checkpoints, early stopping, as well as saving logs for tensorboard. A validation split of 20% is also set in order for us to validate the model performance during training. 20% was chosen since the data set of 100k is rather small.
date_time = (datetime.utcnow() + timedelta(hours=8)).strftime('[%Y-%m-%d %H-%M-%S]')
tensorboard = TensorBoard(log_dir='./logs/tensorboard/{}'.format(date_time))
early_stopping = EarlyStopping(monitor='val_loss', patience=20)
model_checkpoint = ModelCheckpoint(filepath='./model/wide_and_deep_model.h5',
                                   monitor='val_loss',
                                   save_weights_only=True,
                                   save_best_only=True)
callbacks = [model_checkpoint, early_stopping, tensorboard]

wide_and_deep_model.fit(x={'wide_inputs': wide_inputs_train,
                           'categorical_input_1': categorical_input_1_train,
                           'categorical_input_2': categorical_input_2_train,
                           'categorical_input_3': categorical_input_3_train,
                           'numerical_input': numerical_input_train},
                        y=y_train,
                        batch_size=32, epochs=500, verbose=1,
                        callbacks=callbacks, validation_split=0.2)
I follow Andrew Ng’s Deep Learning Flowchart as a guidance on how to tweak my model configurations after each iteration.
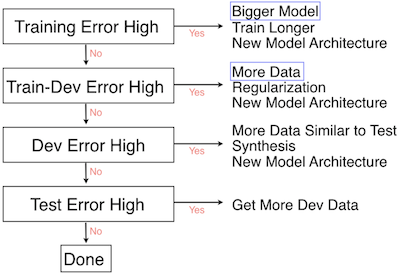
Fig. 5. Deep Learning Flowchart
Tensorboard is used as a tool for me to compare evaluation metrics across different iterations.
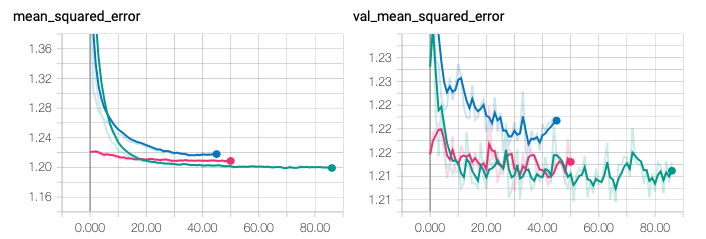
Fig. 6. Tensorboard: Comparing Training and Validation Mean Squared Error across different iterations
Evaluate
After I am satisfied with the validation error, I performed a final evaluation on the test set. Over here, I achieved a mean squared error of 1.21, or a root-mean squared error (RMSE) of 1.10. This fall short of the benchmark performance for MovieLens 100k which is typically has RMSE in the range of 0.92 to 0.96. But on the bright side, it still performs better than a random prediction based on the distribution of the training set, which has RMSE of 1.51.
wide_and_deep_model.evaluate(x={'wide_inputs': wide_inputs_test,
                                'categorical_input_1': categorical_input_1_test,
                                'categorical_input_2': categorical_input_2_test,
                                'categorical_input_3': categorical_input_3_test,
                                'numerical_input': numerical_input_test},
                             y=y_test,
                             batch_size=32, verbose=1)
Inference
In reality, after training and testing, you will be expected to deploy the model into production. During this time, you will only have the independent variables.
Just as an example, you can generate your predictions as follows:
predictions = wide_and_deep_model.predict(x={'wide_inputs': wide_inputs_test,
                                             'categorical_input_1': categorical_input_1_test,
                                             'categorical_input_2': categorical_input_2_test,
                                             'categorical_input_3': categorical_input_3_test,
                                             'numerical_input': numerical_input_test},
                                          batch_size=32, verbose=1)
Source Code
You can see all of the codes on my Github by clicking here!
Reference
[1] Heng-Tze Cheng et al. Wide & Deep Learning for Recommender Systems
[2] Heng-Tze Cheng et al. Wide & Deep Learning: Better Together with Tensorflow
[3] Tensorflow Large-scale Linear Models with Tensorflow
[4] Sabyasachi Sahoo Residual blocks - Building blocks of ResNet
[5] Scikit-Surprise Movielens 100k Benchmark
Thank you for reading! See you in the next post!